
Whether you are a long-time pet owner or a first-time dog owner, a well-behaved dog that does not chew up your expensive shoes or tear apart your book collection is what you want.
It’s also ideal if your pup informs you of when they need to go outside to potty. The good news is that this is possible through crate training. When that happens, make sure to install an electronic dog door so they can head outside by themselves.
Many dog breeds like border collies are smart so they will naturally head out to go potty by themselves before you know it!
Table of Contents
Choosing A Dog Crate
There are several types of dog crates and they come in different sizes. Below are the common three.
The best dog crate should be just large enough for your pooch to stand up and turn around in.
If you have a growing puppy, it is best to choose a crate size that will accommodate her adult size. If your crate is a little big, block off the excess crate space with a divider so your furry friend can’t cause an accident on one end and retreat to the other. Gradually, you can give her more space.

With that said, let’s go over these three common types of dog crates.
1. Flight Kennels
As the name suggests, flight kennels or airline kennels are used when you are flying with your canine friends. They are generally made of plastic material so they are firm, sturdy, and hard. One of the key features of the flight kennel is that it is collapsible. There are three parts to the flight kennels:
- Safety latches.
- Breathing holes.
- Firm metal door.
If you’re traveling and flying with your pooch, make sure to have the “live animal” stickers on the flight kennels so airline staff members are aware and will handle them with care. It’s important to have “this way up” stickers around all sides of the flight kennel as well to avoid any accidents and prevent injuries to your pups.
Those who prefer to carry their small dogs on board the plane with them can also check in their empty crate. It’s crucial that you mark the flight kennel as “empty” if it is not collapsible. If it is collapsible, make sure it is flattened so it is clear that there is no dog inside.
The other two types of dog crates are:
- Collapsible fabric dog crates with rigid frames.
- Collapsible metal dog pens.


Why is crate training important?
Many people view crate training as inhumane or caging up the dogs but that is not true. Crate training a puppy is important because it teaches them both responsibility and independence. There are three main reasons to crate train your pup.
The first reason is housetraining. Dogs naturally do not like to soil their den because they associate it with a space of sleep, comfort, and safety.
Second, crate training limits your four-legged friends from accessing the rest of your house and prevents them from chewing up your valuable household items.
Lastly, if your pooch suffered a serious injury from an accident, using the crate to transport him from your house to the veterinary hospital is one of the safest ways.
The good news is that once your furry pup is well-trained, they will naturally head out to go potty by themselves. You’ll notice a huge difference. At that point, it is a good idea to install an automatic dog door. This way your furry friend can easily access the backyard to go potty in the morning.
Crate provides a calm safe place
A dog’s natural instinct is to seek out a comfortable, safe, and calm place when its surrounding environment becomes overwhelming or loud. They are naturally den animals and being in a small enclosed space helps calm their anxiety and provides a sense of security.
Crate Training 101

While crates are effective in housetraining your dogs, be aware that it is not the only solution to all canine misbehavior. Also, if crates are not used correctly, it can cause your dogs to feel trapped and frustrated. Therefore, below is a list of crate training advice.
- The crate is used for training and a place of comfort and safety. Never use the crate as a form of punishment because your dog may associate it with something bad and will be afraid of it. As a result, your pup may refuse to enter.
- Try not to leave your pooch in the crate for too long. If your dog is crated all day and night, she may not get enough exercise or human interaction. This could result in her becoming depressed or anxious. Dog breeds like Labrador Retrievers or German Shepherds require daily exercise and social interactions.
- If you have to work during the day, it’s best to hire a pet sitter, take him to doggie daycare, or bring her to work with you.
- If your puppy is under six months old, she should not stay in a crate for more than three or four hours at a time because puppies are not able to control their bladders or bowels for that long.
- The same goes for housetraining an adult dog. Avoid having her stay in the crate for more than three or four hours at a time.
- Continue to crate your canine until they’re able to be alone in the house without causing any accident or destructive habit.
- If you’re going to be away for a few hours and worry that she’ll be in the crate for too long, you can graduate her from a crate to the living room enclosed with a retractable dog gate or indoor dog gates.
- When you are home, leave the crate door open. This allows your pup to enter it when she needs a safe space and leave it as she pleases. The crate should always include a comfortable bed or padding.
Crate Training Process
Depending on your dog’s age, past experiences, and temperament, crate training a puppy may take days or even weeks. Be patient and stay calm.
Remember these three tips when crate training your four-legged friends:
- The crate should always be associated with something good and pleasant. If your pooch associates it with a calm and relaxed mindset, she will enjoy staying in there and sees it as a place of rest and comfort. Start by bringing her in for 10 minutes at a time and then work your way up from there.
- Crate train in small gradual steps.
- Don’t rush the crate training process.

Step 1: Introduce A Crate To Your Dog
After you decide on the best crate for your pooch, it’s time to introduce her to the crate.
First, find a space in your house such as the family room where the family spends a lot of time.
Next, place a soft blanket or towel inside the crate. Or use a crate mat. Some dogs prefer hard surfaces.
Then, take the door off. Let your dog explore the crate at her leisure. Don’t rush it. Naturally, dogs will get curious and start exploring the crate. She may end up sleeping in the crate right away the first night you introduce it to her. However, if you find that your dog isn’t naturally interested in the crate, here is what you can do:
- Bring or walk her over to the crate. In a cheerful tone of voice, talk to her. The crate door should be open or secured so it won’t hit your dog as she walks in. If the door isn’t secured and closes, it may frighten her.
- If she isn’t naturally walking into the crate, drop some small food treats leading into the crate, then just inside the door, and finally all the way inside the crate. Small food treats will encourage her to enter the crate. If she refuses to go all the way in at first, that’s fine. Don’t worry and do not force her to enter.
- Gradually, continue dropping treats into the crate until she walks calmly all the way into the crate to get the food. If dog treats aren’t what she’s interested in, try gently tossing her favorite toy inside the crate. Note that this step may take a few minutes or even several days. Remain calm and stay patient.
Step 2: Feeding Your Dog Their Meals in the Crate
After introducing your dog to the crate, begin feeding her at least one meal a day near the crate. By eating near the crate, this will create a pleasant association with the crate.
- If your furry friend is naturally entering the crate when you start Step 2, step it up a notch and place their meal all the way to the back of the crate.
- If she is still reluctant to enter, start small. Put the meal only as far inside as she will readily go without becoming scared or anxious. Then, each time you feed her, place the meal a little further back in the crate.
- Once your dog is standing comfortably in the crate to eat her meal, you can close the door while she’s eating. We recommend that the first time you do this, to leave the door open as soon as she finishes her meal. Then after each successive meal, you can leave the door closed a few minutes longer than the last. Continue to do this until she is staying in her crate for 10 minutes after eating.
- If you noticed that your dog is whining to be let out, it could be that you may have increased the length of time too quickly. After her next crate meal, try leaving her in the crate for a shorter time period than before. If she does whine or cry in the crate, try not to let her out until she stops. Otherwise, she will learn that the way to get out of the crate is to whine. Once she gets her way she will keep doing it, which is not good behavior.
Step 3: Train With Longer Crating Periods
After you notice that your dog eats her regular meals in the crate with no sign of fear or anxiety, you can begin to keep her in there for short time periods while you are home.
- Call her over to the crate and give her a dog treat.
- Give her a command to enter the crate, such as “crate.” Point to the inside of the crate with a treat in your hand to encourage her.
- As soon as your dog walks into the crate, praise her with “good girl!” and give her the treat. Then slowly close the crate door.
- For 5 to 10 minutes, sit near the crate with her. When you’re ready, head into the next room for a few minutes. Then, return back to the room with the crate and sit again for a short time. After this short time, you can let her out.
- Do this process several times a day. While it is a lot of work, it is worth it in the end. You can start to also gradually increase the length of time you leave her in the crate and the length of time you are out of her sight.
- Once you noticed that your dog stays quietly in her crate for about 30 minutes with you out of her sight, you can begin to leave her crated when you’re out of the house for short time periods. You can also let her sleep in the crate at night. Remember not to keep her in for longer than three to four hours. While dogs naturally do not want to soil where they sleep, if you keep her in there for too long without going out for her potty, she may end up soiling. Again, stay patient because this step may take several days or even weeks.
Step 4: Avoid Wearing Collars or Tags While In The Crate
When your dog is in the crate, we advised that she or he should never wear his collar, ID tags or anything on. It could be very dangerous for your furry friend if her ID or rabies tags get caught in the crate. This could lead to strangulation.
Step 5: Crate Your Dog When You Leave The House
Once your canine pooch can spend at least 30 minutes in the crate without being afraid or anxious, you can begin to leave her crated for short periods when you leave the house.
- First, using your regular command and dog treats, have your dog walk into the crate. It is a good idea to leave a few safe toys inside the crate.
- You can crate your dog anywhere from five to 20 minutes before you leave. Try not to crate them for too long before you leave.
- Once your dog enters the crate, praise her briefly and give her a treat. Then silently walk away.
- When you leave your house, it should be matter-of-fact and not emotional or prolonged.
When you come home, stay calm so that your dog does not get overly excited when seeing you. If your dog gets too excited, don’t reward her by responding in an enthusiastic way. Stay calm and keep your arrivals low-key. This helps avoid increasing their anxiety over when you will let them out.
When you are home, continue to crate your dog for short periods from time to time. This way, she doesn’t associate crating with being left alone.
Step 6: Crate Your Dog At Night
At night, have your furry friend sleep in the crate. To get her to the crate, use your regular command and a dog treat.
If you have a puppy, it is a good idea to initially put the crate in your bedroom or in the hallway near your bedroom. This is a good idea because puppies often need to go outside to potty during the night. By having the crate in your bedroom, you’ll be able to hear your puppy whine. This will inform you that she wants to be let outside.
If you have older dogs, it is also a good idea to initially have the crate in your bedroom or nearby your bedroom so she doesn’t associate the crate with social isolation.
When you noticed that your furry friend is sleeping comfortably throughout the night with the crate near you, this is a good sign.
You can then begin to gradually move her crate to the location in the house that you prefer. Keep in mind that many owners actually allow their furry friends to sleep on their beds because it is a chance to strengthen the bond between the owners and their pets.
Crate Training Problems
Whining at night.
At night, if your dog whines or cries while in the crate, it could be difficult to determine if she’s whining because she wants to be let out of her crate or she needs to be let outside to eliminate. However, from the training procedures above, if you didn’t reward your dog for whining in the past by releasing her from her crate, then try to ignore the whining.
Sometimes your dog may test you and will probably stop whining soon. Try not to yell at them or pound on the crate. This will not help and only make things worse.
If the whining continues after you’ve ignored them for several minutes, it could be that your dog needs to head out to go potty. You can use the phrase your furry friend associate with going outside to potty. If she responds and becomes excited, take her outside. Make sure this is a potty trip and not playtime.
If you think your dog doesn’t need to head out to potty, then it is best to ignore her until she stops whining. Do not give in to her whining. If you do, there could be negative consequences.
By giving in to her whining, you’ll teach her to whine loud and long to get what she wants. If you’ve progressed gradually through the training steps and gone at a steady pace, there’s a less likely chance that you’ll encounter this problem.
If her whining is to get your attention in order to be let out of her crate and this problem becomes unmanageable, it is a good idea to start the crate training process over again.
Separation anxiety: If your dog has separation anxiety, it can only be resolved with desensitization procedures and counterconditioning. If this progresses, it is a good idea to consult with your vet or a professional animal-behavior specialist for help.
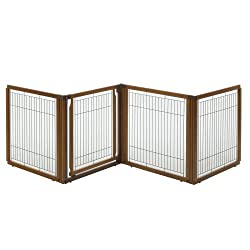
If you’re looking for a pet gate that converts to a freestanding gate, a room divider, or a pet pen, the hardwood Richell Convertible Elite Pet Gate is the solution.
Whether you have small or large dogs, the convertible pet gate provides different dimensions based on your needs. If you have a growing puppy and no longer need it, the pet gate can be folded for storage.
One of the great features of this retractable dog gate is the lockable gate door. It allows easy access from one room to another without having to move the entire gate.
Richell Convertible Elite Pet Gate Key Features:
- Comes in 4-Panel or 6-Panel, depending on your needs
- Great for dogs of all sizes
- Hardwood pet gate
- Convertible: Converts from free standing pet gate to a room divider to a pet pen
- A lockable gate door allows easy movement from room to room
- Specifically designed cap locks the panels in place at 90 and 180-degree angles which provides extra stability
What customers are saying:
Pros
- Many pet owners love how large, sturdy, and stable the free-standing gate is.
- The door mechanism is impressive and it keeps the door closed.
- Dog owners praised how easy it is to use the retractable dog gate. They lift the gate vertically and it opens right up. When they want the gate to stay closed, they simply push it in.
- Some owners have had this gate for years and recommend it to anyone looking for a dependable gate that also looks nice in their home.
- The convertible pet gate is easy to assemble. There are many configurations possible and can be folded up and put away.
Cons
- A few customers pointed out that disassembling the gate can be quite difficult due to the design of the pins.

The AMZpets Puppy Teething Toys comes with seven different kinds of cotton chewing ropes. There’s two (2) indestructible tug of war ropes, two (2) dental cotton chewer knots, and three (3) cotton rope balls.
These durable toys are designed for puppies that are teething or aggressive chewers. Made of high-quality cotton fibers, the toys are natural, safe, and washable. Instead of biting or chewing on dog leashes, sofas, shoes, or pillows, your pup can chew on the toys instead.
Chewing can also help to reduce their anxiety and stress. Please always supervise your furry family members when they’re playing with these toys.
AMZpets Puppy Teething Toys Key Features:
- A convenient carry bag with shoulder straps is included
- Great for puppies that are teething and aggressive chewers
- Comes in a variety: 2 tug of war ropes, 2 dental cotton chewer knots, 3 cotton rope balls
- Not recommended for overly aggressive chewers or small dogs
What customers are saying:
Pros
- Dog owners love the variety of toy sizes and shapes in this pack.
- Owners are happy with how durable the toys are. They’ve had them for weeks and are happily surprised the yarn didn’t bleed colors onto the carpet.
- Owners also noticed that this variety pack is good for their average or slightly aggressive chewers.
Cons
- A few customers were disappointed that this variety pack toy is not for dogs that are overly aggressive and super chewers.

With over five years of specialized experience as an animal writer, my expertise lies in dog nutrition, health, behavior, grooming, and training. I am dedicated to delivering helpful and informative content that caters to the well-being of our furry friends. My primary goal is to empower pet owners with knowledge and ensure our canine companions thrive in health and happiness. In my free time, I love volunteering at local dog rescue centers.